皆さんこんにちは。
ネットワールドのストレージ担当の多川です。
今日はIsilonからリブランドされた、PowerScaleのUPS連携について簡単に紹介したいと思います。
他のストレージ製品と同様にSSHを有効化するだけでシャットダウン連携できるのでは?
と思われるかもしれませんが、シャットダウンだけならSSHだけでできちゃいます。
ただし今回は起動まで連動させますが、PowerScaleはIsilon Gen6とは若干仕様が違います。
- Isilon Gen6:通電でノード起動できたため、PDUかUPSの制御で電源オンできた
- PowerScale:通電後、前面の電源ボタンを押す必要がある
電源オフはリモートで可能だけど電源オンはオンサイトして電源ボタンを押す、なんてことになると大変なのでOneFS9.0から実装されたIPMIを有効化して連動させることにしました。
ご存じない方のために簡単に説明しますとIPMIとは、Intelligent Platform Management Interfaceの略で、リモートから機器を管理・監視するための機能とお考え下さい。

今回はIPMIを利用してリモートから電源オンをしたいと思います。
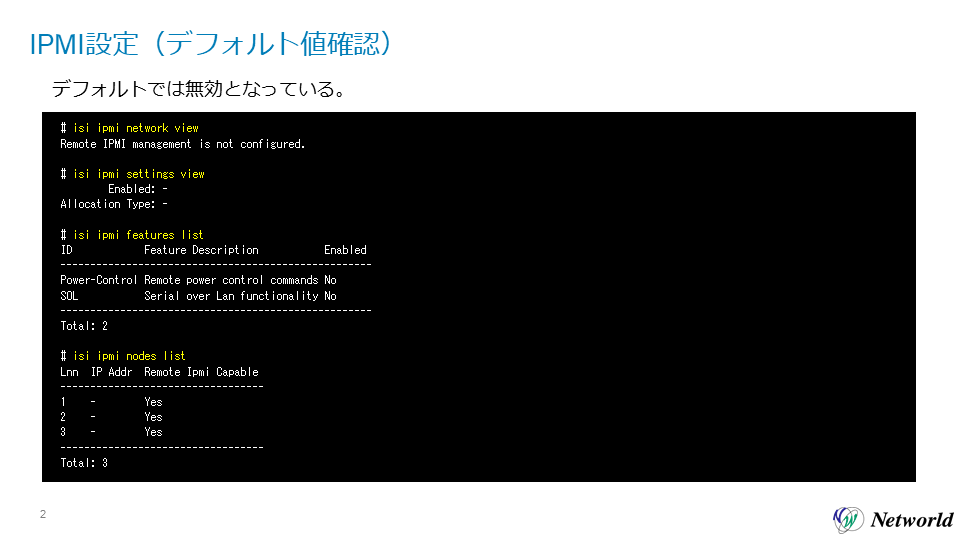
PowerScaleではIPMIはデフォルトで無効になっており、有効化しない限り利用することができません。以下はデフォルト値を確認した結果です。
|
# isi ipmi network view # isi ipmi settings view # isi ipmi features list # isi ipmi nodes list |
見て頂くとわかりますが、使える機能は電源制御とSerial over LANがあります。
そのままIPMIを有効化していきます。

|
# isi ipmi settings modify --enabled=true --allocation-type=static # isi ipmi settings view # isi ipmi network view # isi ipmi network modify --gateway=10.40.4.254 --prefixlen=22 --ranges=10.40.5.21 |
ここで注意点です。
IPMIはPowerScaleで既に使用しているサブネットと同じサブネットを指定することができません。
(コマンド実行すると失敗し、設定できません。)
気を取り直して別のセグメントを指定します。
今度はレンジ指定で3つのIPアドレスを割り当てました。

|
# isi ipmi network modify --gateway=192.168.200.254 --prefixlen=24 --ranges=192.168.200.11-13 # isi ipmi network view # isi ipmi node list # isi ipmi network modify --clear-ranges |
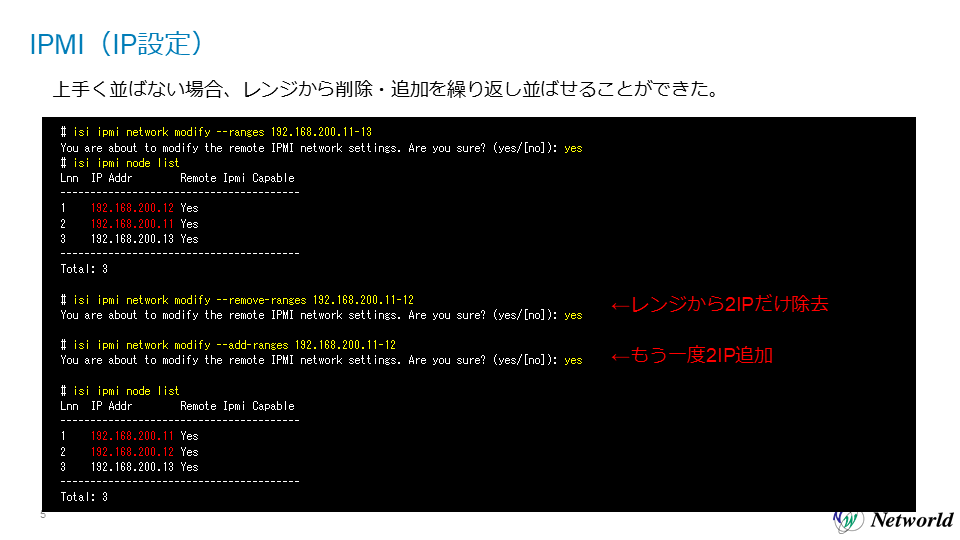
すると、若番ノードから順にIPアドレスが振られていません。
このままでも使えはしますが、順に並んでいないと気持ち悪いです。日本人なので。
そこで悪あがきしてみたところ、順に並べることができました。
|
# isi ipmi network modify --ranges 192.168.200.11-13 # isi ipmi network modify --remove-ranges 192.168.200.11-12 # isi ipmi network modify --add-ranges 192.168.200.11-12 # isi ipmi node list |
3つのIPレンジから2つのIPアドレスを除去し、再度2つのIPレンジを追加しました。
この時も順に並ぶ保証はないので、うまくいかなければ何度か試してください。
IPアドレスが設定できましたので、機能を有効化していきます。
PowerControlだけ有効化していれば電源制御は可能です。

|
# isi ipmi features modify Power-Control --enabled=true # isi ipmi features list # isi ipmi features modify SOL --enabled=true # isi ipmi features list |
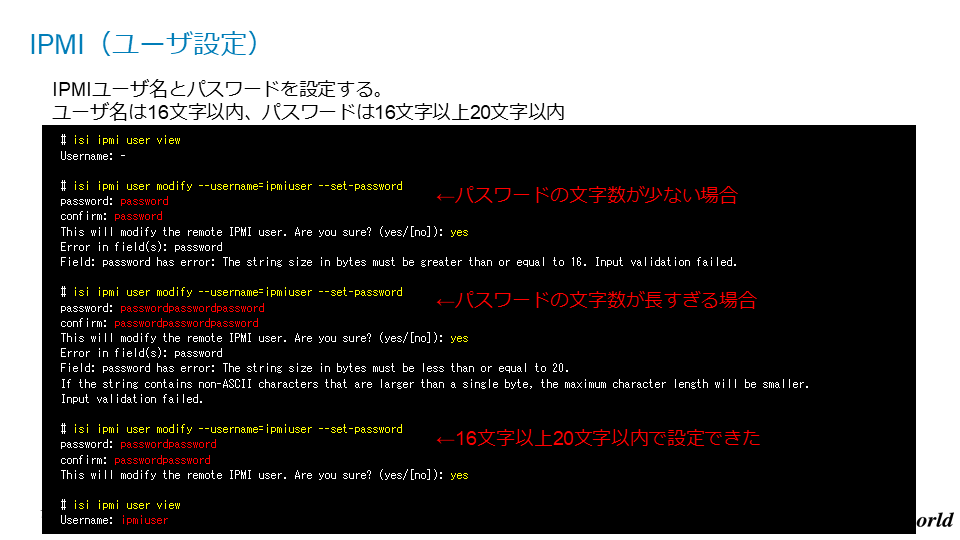
続いてIPMIで使用するユーザを設定していきます。
パスワードの要件が16文字以上20文字以内と比較的長めのパスワードが必要です。
|
# isi ipmi user view # isi ipmi user modify --username=ipmiuser --set-password # isi ipmi user modify --username=ipmiuser --set-password # isi ipmi user modify --username=ipmiuser --set-password # isi ipmi user view |
これでPowerScale側の設定は終わりましたので、次はiDRACを見ていきましょう。
ログインはいつものデフォルトcalvinではないのでご注意ください。
製品前面のタグを引っ張り出し、その裏面にパスワードが記載されています。
iDRAC側のユーザを見ていきましょう。

確認すると先ほど設定したIPMIユーザが存在しているのがわかりますね。
次に、実際にIPMIコマンドでPowerScaleにコマンド発行できるか試してみたいと思います。
Windows上で使えるIPMIツールは「Dell EMC iDRACツール」内に含まれていますので、テストはこのツールを使っていきます。
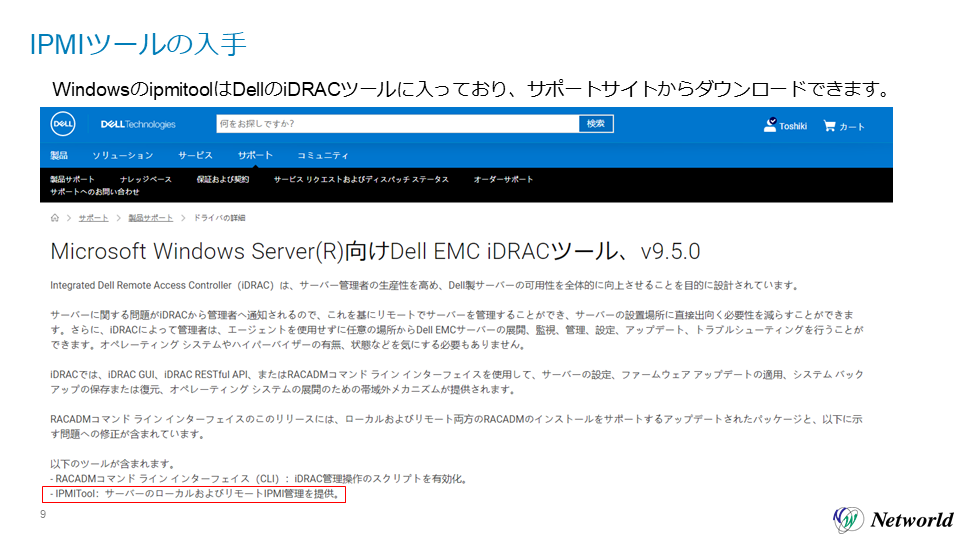
ダウンロード後、インストールするとIPMIを利用できます。
早速実行してみます。
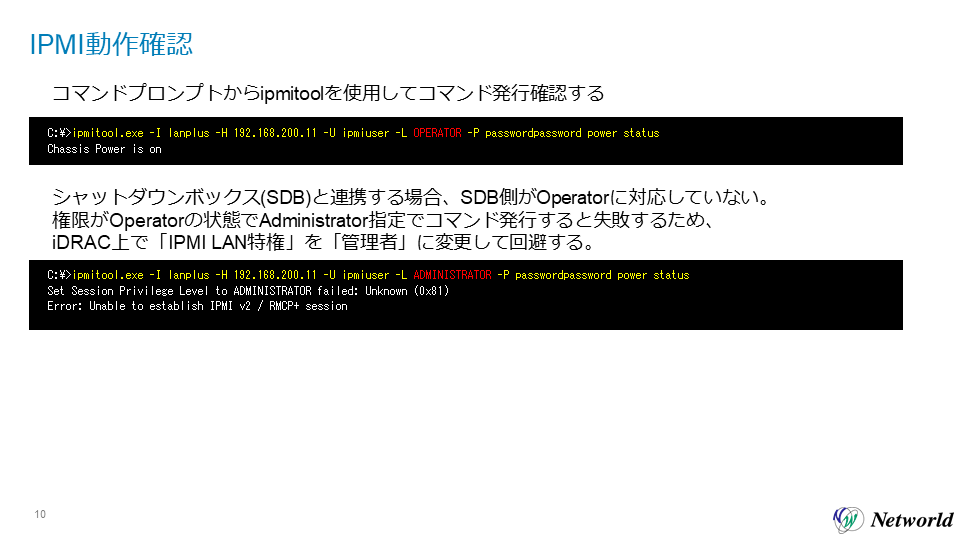
| C:\>ipmitool.exe -I lanplus -H 192.168.200.11 -U ipmiuser -L OPERATOR -P passwordpassword power status Chassis Power is on |
今回は電源ステータスの取得をIPMIで行いましたが問題なく情報取得できました。
ただし、今回はUPSソリューションズ社のシャットダウンボックスという機器を使用してIPMI実行しますが、この機器は権限Operatorで実行できずAdministratorでの実行となってしまいます。
| C:\>ipmitool.exe -I lanplus -H 192.168.200.11 -U ipmiuser -L ADMINISTRATOR -P passwordpassword power status Set Session Privilege Level to ADMINISTRATOR failed: Unknown (0x81) Error: Unable to establish IPMI v2 / RMCP+ session |
そのため以下のようにiDRAC側でIPMIユーザの権限の変更をすると、Administratorで実行できるようになります。
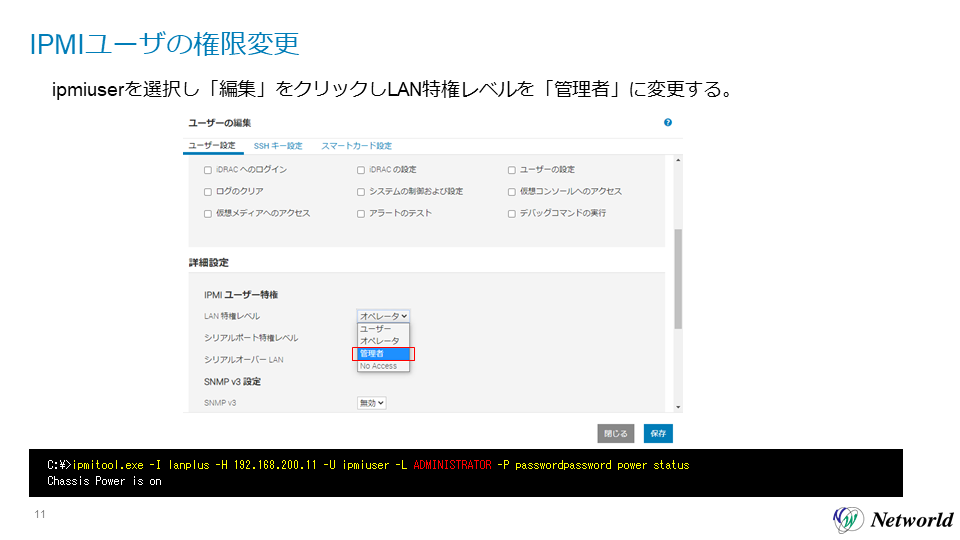
| C:\>ipmitool.exe -I lanplus -H 192.168.200.11 -U ipmiuser -L ADMINISTRATOR -P passwordpassword power status Chassis Power is on |
ただしこの設定は、故障などでノード自体を交換すると再設定する必要がありますので、ご注意ください。
また、こんな事しなくてもPowerEdgeベースだからBIOSで通電と同時に自動起動の設定にすれば良いのでは?
と考えられるかもしれませんが、確認したところ残念ながらサポート範囲外となってしまうそうです。
ということで、今回はPowerScaleのシャットダウン連携準備編でした。
次回は実際のシャットダウン連携をお送りします。
次回もお楽しみに!
Networld Techのブログ一覧はこちら!
https://www.networld.co.jp/product/emc/tech-blog/